
How to Get an Emergency Passport Before Your International Flight

If you’re running out of pages in your passport and have an international trip on the horizon, here's exactly what to do, including the midnight appointment trick that worked for us. We've been full-time international travelers for years, and there's one document drama that can derail even the most seasoned trip: a passport with few or no pages left. We knew we were cutting it close, but our border control agent in Thailand let us know that we were making it through by a hair. Our passports still had seven years of validity remaining but only two pages each left for stamps and visas. We needed new passports, fast.
Here's what we learned about getting an emergency passport renewal in the United States when you're departing internationally within 14 days.
Who qualifies for an emergency appointment?
U.S. Passport Agencies offer in-person, same-day service for travelers with documented international travel within 14 days (or 28 days if a foreign visa is required for your destination). However, appointments fill up fast and you cannot get a standard rush appointment farther out than exactly 14 days.
Visa Warning
We deliberately held off on arranging any upcoming visas until we had our new passports in hand. If a visa is already stamped in your old passport and you need it for upcoming travel, plan accordingly before surrendering that document. Some countries will accept a visa from an expired or canceled passport, so you may have to carry both. However, China is one of those countries that does not allow the use of a visa in a cancelled passport. You will be required to apply for a new visa in your new passport. Although we’re planning to visit China next year, we are so glad we didn’t jump the gun and coordinate a visa under our old passport!
Step 1: Book your appointment online — exactly 14 days out
Appointments at U.S. Passport Agencies are booked online through the State Department's scheduling portal. They do not accept phone calls for scheduling regular appointments. The window opens exactly 14 days before your international departure, and not a day sooner. I tried and when my travel date showed that it was 15 days out, the website blocked me from proceeding further.
Note that you only need one appointment for everyone in your party who is traveling together.
In-person passport appointments are fairly straightforward
We booked ours at midnight, the exact moment the 14-day window opened. Appointment availability varies significantly by city. Larger agencies in major metros may fill up within minutes of slots becoming available, so set an alarm and be ready to click fast. We booked ours in Houston. Initially it looked like there weren’t many options, as we filtered through the choices, we could see that we did have more options than we feared would be available. In fact, when we realized the building did not have anyplace to get our photos taken, we were able to push out the appointment to a slightly later time. Note that we only saw morning appointments. Based on our experience, it seemed that pickups for finished passports all happened in the afternoon and drop-offs happened in the morning slots.
Step 2: Gather your documents
You'll need to bring everything with you the day of your appointment. Here's what we showed up with:
Completed Form DS-82 (printed, not submitted online). We used the online form to type in our answers but we did not submit it online. You need a paper copy and if you submit it online, that will create a huge mess.
Proof of citizenship (e.g., we brought our unexpired passports which doubled as a government-issued photo ID)
Valid government-issued photo ID
New color passport photo (2x2 in., white background)
Flight itinerary confirming departure within 14 days
Current (expiring) passport
We had our new passport photos taken ahead of time and stapled them to our applications along with the printed itinerary. Arrive organized. Agents see a lot of people and appreciate not having to ask for missing documents.
Note on Passport Photos
We stopped at a Walgreens for our passport photos, but honestly that was not ideal. The first person who was helping us did not know what she was doing. Someone else stepped in and had more information, but she also had a lot of incorrect information. I’m stuck with a horrible photo for the next ten years, but at least it met the guidelines and the passport office did not reject me!
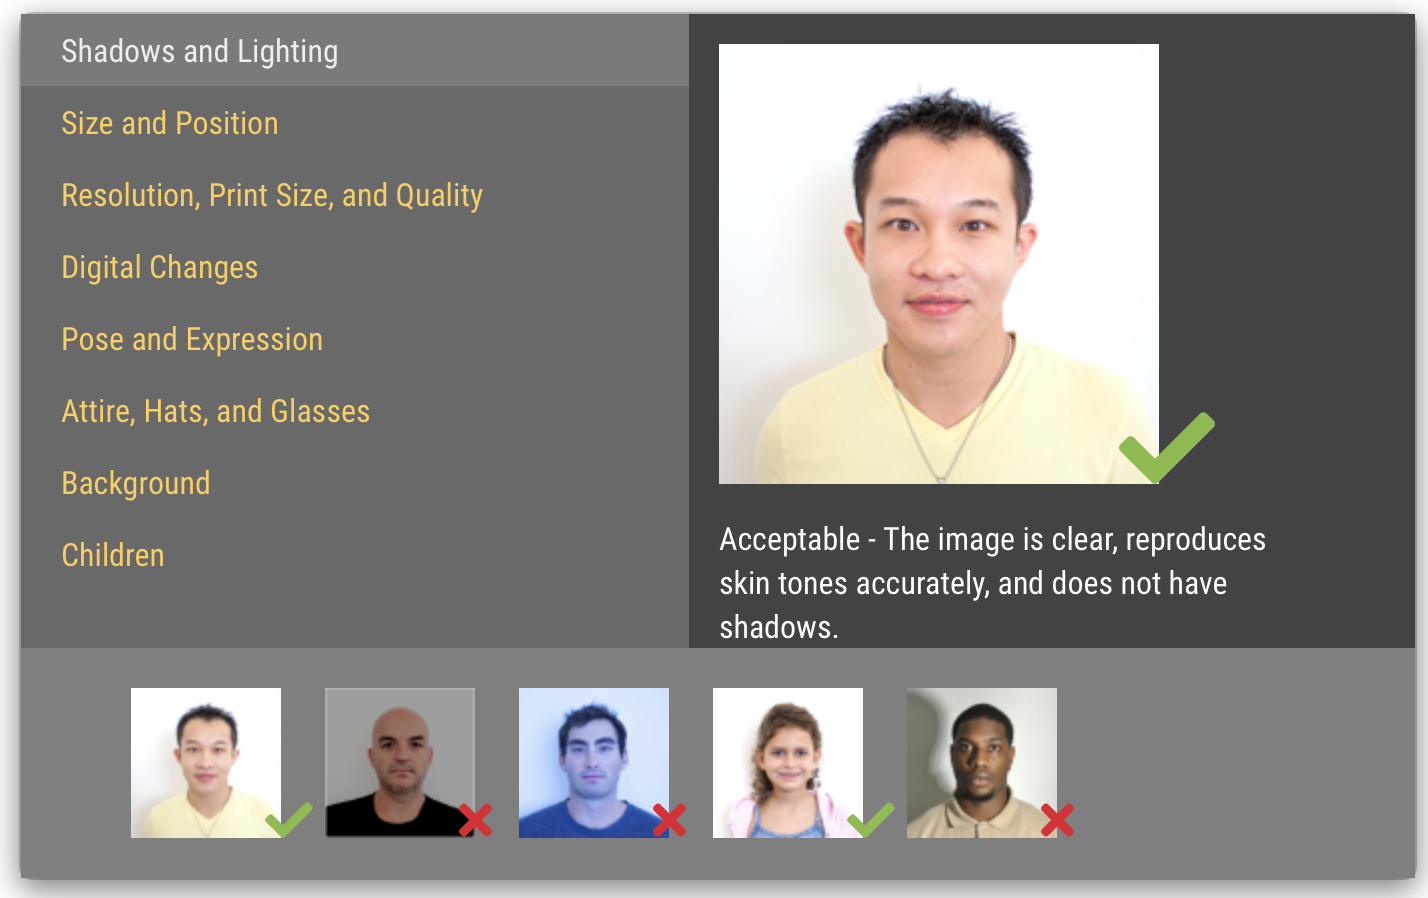
Here are some of the biggest mistakes that can cause your photo to be rejected:
Shadows on Face/Background: Shadows are the number one cause of rejection. These are often caused by standing too close to the wall or having lighting behind the subject.
Wrong Paper: For printed photos, using regular printer paper instead of high-quality glossy or matte photo paper.
Head Tilted or Not Frontal: The applicant must look directly into the camera. A slight tilt or turning of the head ruins the biometric requirements.
Incorrect Head Size/Framing: The head must measure between 1 inch and 1 3/8 inches (25–35 mm) from the bottom of the chin to the top of the head. People often stand too close (head too large) or too far (head too small).
Smiling Too Broadly: A "neutral" expression is required, meaning mouth closed and eyes open. While a slight smile is allowed in some cases, showing teeth is usually a reason for rejection.
Hair Obstructing Face: Hair must not cover the eyes, eyebrows, or face.
Wearing Glasses: As of 2016 (in the U.S.), eyeglasses are not allowed in passport photos
Filters/Editing: Using apps to edit the photo, remove the background, or add filters is prohibited. We saw online tools that facilitated this, despite it being a big no-no.
Old Photos: The photo must be taken within the last 6 months to reflect your current appearance. Since you are showing up in person, a new haircut or significant weight changes or aging all can be red flags.
Take the time to ensure your passport photo meets the Passport Agency’s guidelines. If not, they won’t accept it and you’ll have wasted your appointment!
Step 3: The day of your appointment
When you arrive at the passport agency, you'll pass through a security checkpoint before reaching the service area. Expect to wait in line. We came prepared with everything organized, which helped move things along smoothly.
Originally, the agent told us our passports would be ready for pickup two days later, which would have been a Friday. Since we were leaving town that same Friday for another US city, we explained our constraint. They accommodated us and asked us to return after lunch the same day. We came back around 3pm, waited about 30 minutes and walked out with new passports in hand. Everyone was extremely friendly and helpful.
A note on extra pages
When we renewed our passports right after COVID, the option to add extra pages wasn't available. This time, it was, and we paid for them. If you're a frequent international traveler, it's worth adding pages while you're there. Stamps add up faster than you'd expect.
What it cost us
2026 COST BREAKDOWN (PER PERSON)
Emergency passport + extra pages $190 (via credit card only—no cash)
If using a private expediter (2–3 day delivery) $500+
At $190 per person, the direct agency route is significantly more affordable than working through a private expediting service, which can run $500 or more. The trade-off is that you must appear in person, but for same-day service, that's actually the faster path.